
How to Crochet Complex Stuffed Animals: Unique Gift Patterns That Look Store-Bought
The fastest way to make a handmade gift feel priceless is to make it look "impossible." If you've searched How to Crochet Complex Stuffed Animals, you're probably aiming for that wow factor: detailed faces, smooth shaping, and pieces that sit, stand, or hug just right. This guide gives you a clear plan for building advanced amigurumi (crocheted stuffed toys) without the usual trial-and-error. You'll learn what makes a pattern "complex," how to choose the right yarn and tools, and how to finish cleanly so your gift looks professional.
Complex doesn't mean confusing. It usually means the toy has more parts, more shaping, and more small details that need to line up. Once you understand the building blocks, you can crochet dragons, realistic dogs, character dolls, and fancy woodland creatures with confidence.
What Makes a Stuffed Animal "Complex" (and Why Gifts Benefit)
A complex stuffed animal is basically a puzzle you can hold. It's made of multiple shaped parts that have to match up: a head with sculpted cheeks, limbs that bend, or a body with color changes that land in the right spot. Complexity can also come from texture, like bobble stitches for sheep fleece, or from construction, like jointed legs or wire-supported wings.
Gift giving is where complex designs shine. People remember the little details, like embroidered eyelids, a neatly aligned snout, or a tail that curls naturally. Those features make your crochet feel custom, not homemade in a messy way.
Here are the most common "complexity boosters" you'll see in advanced crochet patterns:
- Many separate pieces (ears, muzzle, paws, horns, wings)
- Shaping with increases and decreases placed in specific spots
- Colorwork (stripes, patches, gradients, facial markings)
- Surface details (embroidery, needle sculpting, appliques)
- Special textures (bobble, spike stitches, faux fur yarn)
- Unique poses (sitting hips, standing feet, bent arms)
If you already know basic amigurumi, the next level is learning control. You're controlling symmetry, tension, and placement so the toy looks exactly like the photos.
For extra inspiration, this topic pairs well with best crochet patterns for advanced techniques, especially if you want designs that teach skills while you stitch.
How to Crochet Complex Stuffed Animals with a Repeatable Build Plan
The secret to How to Crochet Complex Stuffed Animals is having a repeatable method. Complex toys feel hard when you improvise too much. They feel doable when you treat them like a series of small, checkable steps. I like to think in "modules," meaning each body part is its own mini project, and assembly is a planned phase, not a rushed ending.

Start by reading the whole pattern once, even if you hate doing that. Look for a list of parts and note which ones must be mirrored (like arms or ears). Mark where safety eyes go, and note any places you need to stop and stuff firmly.
A solid build plan looks like this:
- Make and label all small parts first (ears, horns, tails, spots)
- Crochet the head and place facial features before closing
- Crochet the body and check posture as you stuff
- Crochet limbs and test their angle against the body
- Assemble with pins, then sew, then sculpt and detail
After you finish a step, pause and compare to the pattern photo. This is where the "complex" part becomes manageable, because you fix small issues early instead of hiding them under seams later.
If you're also practicing harder stitch patterns, pair this guide with how to crochet intricate patterns to level up texture, shaping, and stitch reading.
Materials That Make Advanced Amigurumi Look Clean and Gift-Ready
Your yarn and tools can either help you or fight you. For complex stuffed animals, you want stitches that hold their shape and hide stuffing well. Most advanced makers reach for a smooth, tight, non-splitting yarn so details stay crisp. Cotton is great for stitch definition, while acrylic can be softer and more cuddly. If the pattern has a lot of facial shaping, stitch clarity matters more than softness.
Hook size is a big deal. For amigurumi, you usually go smaller than the yarn label suggests. That tighter fabric keeps stuffing from peeking through. If you notice gaps, drop down another hook size and keep tension even.
Here's a reliable "gift-ready" tool kit for complex stuffed animals:
- Stitch markers (the locking kind) to track rounds and feature placement
- A blunt tapestry needle for sewing pieces together
- A sharp embroidery needle for facial details and sculpting
- Polyester fiberfill stuffing, packed firmly in structural areas
- Pins or clips for test-assembling before sewing
- A small brush (for fuzzy yarns) and tiny scissors for clean trimming
If you sell or gift to children, safety eyes can be a concern. Many makers choose embroidered eyes for toddlers. The U.S. Consumer Product Safety Commission has guidance on small parts and choking hazards, which is worth reading if your gifts go to little kids: CPSC Small Parts Regulations.
Also, note that yarn labels include care instructions and fiber info, which helps you choose washable gifts. Craft Yarn Council provides standard yarn weight info that makes pattern matching easier: Craft Yarn Council Yarn Standards.
Shaping and Assembly Tricks That Separate "Cute" From "Professional"
This is the part where complex toys become art. Shaping is about where you place increases and decreases, but it's also about stuffing strategy and sewing angles. If you stuff a head evenly, it can look round but flat. If you stuff with intention, you get cheeks, brows, and a muzzle that pops.
One trick: stuff in layers. Add a little, shape with your fingers, then add more. For long limbs, use small bits of stuffing pushed in with the back of a crochet hook or a stuffing tool. Avoid one giant wad. That creates lumps.
Assembly is where most "almost perfect" toys fall apart. Pin everything first. Step back and check symmetry. Then sew using a mattress stitch (a seam that hides inside stitches) whenever possible. If the toy needs a specific pose, sew limbs on while the body is slightly under-stuffed, then finish stuffing after the seams are stable.
Use these finishing moves to instantly upgrade your gift:
- Needle sculpt the face (tighten thread between points to form cheeks or eye sockets)
- Add a tiny white eye highlight stitch for a lively look
- Use invisible decreases to reduce "holes" in shaping
- Close openings with a smooth drawstring finish, then bury the tail
- Brush faux fur yarn gently after sewing to hide seams
You can learn a lot from toy safety and plush construction standards too. The American Academy of Pediatrics regularly updates safe sleep and toy guidance for babies, including warnings about loose parts and strings: AAP Parenting Guidance.
One more freshness note: in 2026, buyers and gift givers are still favoring "heirloom crafts" and personalized items, especially for baby showers and milestone birthdays. The trend is clear on marketplaces and craft reports, where personalization and maker goods stay strong. If you sell patterns, it's a great time to offer complex animals with name tags, birth stats, or themed accessories.
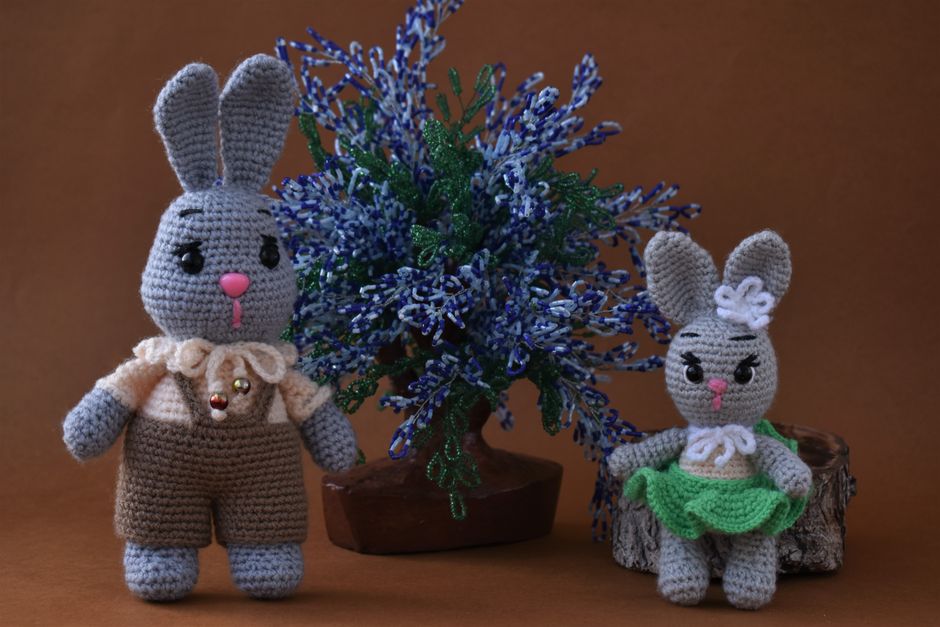
Unique Crochet Pattern Ideas That Feel Made for the Recipient
A gift gets ten times better when it feels specific. Complex stuffed animals are perfect for that because you can match a person's favorite animal, hobby, or memory. Instead of "a teddy bear," you can gift "a bear that looks like your childhood plush," or "a fox in your wedding colors."
Here are unique pattern directions that work especially well for gift giving:
- A zodiac animal set (12 mini animals with matching colors and traits)
- A realistic pet look-alike (custom markings, floppy ears, a signature collar)
- A fantasy creature with accessories (dragon with removable satchel, unicorn with a flower crown)
- A storybook duo (bunny with a carrot bag, mouse with a tiny scarf)
- A seasonal mascot (pumpkin cat, winter penguin with earmuffs)
If you're buying patterns instead of drafting them, look for ones that include lots of photos, assembly diagrams, and exact stitch counts at key points. The best advanced patterns tell you where to place the eyes in relation to rounds, not just "center them."
This is also where my shop approach comes in. I design patterns to be "gift-build friendly," meaning the tricky parts are broken into clear steps, and the finishing details are planned. If you want options built for wow factor, browse buy detailed crochet patterns online for designs that lean into those pro-level details.
FAQ About How to Crochet Complex Stuffed Animals
How Do I Keep My Stuffed Animal Symmetrical?
Use stitch markers and count everything, even if you think you don't need to. Mark the "front center" of the head and body early, then measure placements from those anchors. Pin parts before sewing and take a photo to spot crooked angles. A photo shows imbalance faster than your eyes in real life.
What's the Best Way to Avoid Holes When Decreasing?
Switch to invisible decreases (a decrease method that only uses the front loops). This tightens the fabric and leaves fewer gaps. Also keep stuffing away from the exact decrease area until you finish a few more stitches, then push stuffing back into place.
Should I Use Safety Eyes or Embroidered Eyes for Gifts?
For adult gifts or decor, safety eyes are fast and neat. For babies and toddlers, embroidered eyes are safer because they don't include hard plastic parts. If you're unsure, choose embroidery and sew it tightly, then knot and bury ends inside the head.
How Do I Make My Finished Toy Look More "Store-Bought"?
Focus on three things: clean shaping, clean seams, and clean details. Stuff firmly where structure matters, sew with even tension, and add small face details like eyelids or highlights. Also weave in ends properly by threading tails through the body and trimming inside, so nothing pokes out.
What If the Pattern Feels Too Hard Halfway Through?
Stop and "reset" by completing all remaining small parts first. That gives you quick wins and reduces stress. Then return to the main body with a checklist for assembly steps. Complex projects feel heavy when you treat them as one giant task instead of modules.
A Simple Next Step: Pick One Skill and Build a Gift Around It
Mastering How to Crochet Complex Stuffed Animals doesn't require magic hands. It requires choosing one new skill at a time and repeating it until it feels normal. Pick a project where the complexity matches your goal. Maybe it's a dragon with wings, or a puppy with a sculpted muzzle. Finish it with careful pinning, neat sewing, and a face that tells a story.
If you want a shortcut, start with a pattern that's written for advanced crocheters but still holds your hand with photos and clear assembly notes. That's exactly why I sell detailed designs, so your gift turns out like the picture and you enjoy the process. If you're ready to shop for a next-level project, check buy custom crochet patterns online and choose a pattern that fits the person you're making it for.