
How to Crochet Detailed Patterns: Create and Sell Unique Stuffed Toys
"Details are not details. They make the design." That line gets credited to Charles Eames a lot, and crochet proves it daily. If you're searching How to Crochet Detailed Patterns, you want tight stitches, clean shaping, and tiny features that don't look sloppy. You also want a pattern you can repeat, photograph, and sell without stress. This guide shows how to plan, stitch, test, and price detailed stuffed toy patterns so your work looks pro and sells.
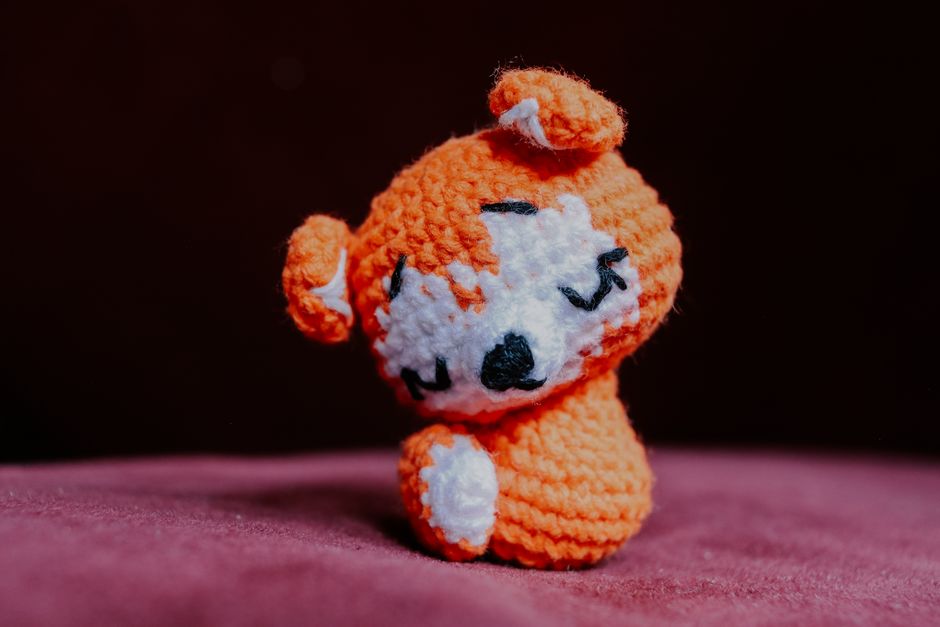
How to Crochet Detailed Patterns That Look Crisp up Close
Small toys get judged up close. A face that looks "fine" from three feet away can look lumpy in photos or in a customer's hands. The secret isn't magic, it's control. You control stitch size, tension, and shaping so every part stacks neatly.
Start with your stitch fundamentals. Most stuffed toys use single crochet in the round because it makes a dense fabric. Dense fabric holds stuffing and keeps safety eyes from pulling. If you're still building core skills, check crocheting tips for beginners so your hands learn consistent tension before you chase micro-details.
Here are the biggest "crispness" upgrades I use when designing detailed stuffed toys:
- Use a smaller hook than the yarn label suggests, usually 1 to 2 sizes down
- Pick smooth yarn for sharp details, cotton or cotton blends work great
- Use invisible decreases (reduce gaps so stuffing doesn't peek through)
- Count every round and write it down immediately
- Stuff in layers, not all at once, so shaping stays clean
Tension is a quiet hero. If your rounds look like they "lean," your stitch height is changing. Try a simple test: crochet 10 rounds of a sphere, then stop and compare round spacing. Even spacing means you're ready for details like eyelids, toes, and snouts.
A quick comparison helps you choose the right approach. High-detail toys usually do better with many small pieces and surface details, while simpler toys rely on chunky shapes.
- High-detail style: smaller hook, more rounds, more parts, cleaner photos
- Simple style: larger hook, fewer parts, faster build, softer look
High-detail takes longer, but it also supports higher prices and stronger "wow" factor on a listing thumbnail.
Planning a Toy Pattern Like a Product, Not a One-Off
A sellable pattern isn't just a finished toy. It's a repeatable recipe that another person can follow without guessing. Think like a product maker. Your goal is to remove confusion, reduce support emails, and create consistent results across different crocheters.
First, choose a clear design target. A "forest mouse" is easier to pattern than "a cute mouse with vibes." Decide the size, pose, and key features that must read instantly. Then break the toy into shapes: head, body, limbs, ears, tail, and accessories.
Before you write a single line of instructions, set your pattern standards. These standards save you later when you're editing and testing.
- Pick one stitch system (US terms or UK terms) and stick with it
- Decide how you'll label rounds (R1, R2, etc.) and sections
- Choose your increase and decrease style and name it clearly
- Define yarn, hook, and finished size based on a test swatch
Now sketch the shaping path. For stuffed toys, shaping comes from increases, decreases, short rows, and strategic stuffing. If you need a refresher on reading pattern language so your writing stays consistent, how to read crochet patterns is a helpful companion.
Once you have the structure, plan your "detail layers." These are the parts people notice first in photos: eye placement, mouth line, blush, stripes, spots, claws, and accessories. The trick is to design details that are secure and repeatable.
- Embroidered details: great control, but needs clear diagrams and anchor points
- Crochet-on details: durable, but can add bulk if yarn is fuzzy
- Felt details: clean look, but some buyers avoid glue or sewing
- Safety eyes: fast and cute, but needs safety warnings and placement guidance
A pattern that sells well usually gives options. For example, "embroidered eyes OR 8 mm safety eyes" lets buyers choose what they trust and what they have.
Build Tiny Features Without Losing Shape (Eyes, Faces, and Texture)
Faces are where "How to Crochet Detailed Patterns" becomes real. A toy can have perfect limbs, but if the face is off by two stitches, it won't feel alive. The good news is that face detail is mostly placement math and tidy finishing.
Start with eye placement rules. On a sphere head, eyes look balanced when they sit slightly below the widest point of the head. For many chibi-style toys, that means placing eyes between rounds 6 and 10, depending on head size. Always state the placement in your pattern as "between R8 and R9, 7 stitches apart," not "place eyes where you like." Freedom is nice, but buyers pay for clarity.
Try this reliable face-building process:
- Mark the center front of the head with a stitch marker
- Count outward to find symmetrical eye points
- Insert eyes or mark embroidery spots before stuffing fully
- Add a small amount of stuffing, then re-check alignment
- Finish stuffing, then sew/embroider details with strong anchors
Texture is another detail lever. Bobbles, front loop only (FLO), and back loop only (BLO) can create ridges, cheeks, and defined toes without extra pieces. Use them on purpose, not everywhere.
Here's a simple comparison of detail methods for stuffed toys:
- Surface embroidery: best for eyebrows, smiles, nostrils, freckles
- Sculpting with yarn (needle sculpting): best for indenting eyes, defining snouts
- Overlay pieces (muzzle, eyelids): best for a "3D face" look
- Color changes: best for stripes, paws, belly patches
Needle sculpting is worth learning if you want premium-looking toys. You pull a strand through the head to create gentle dents around eyes or a lifted nose bridge. It adds realism without adding parts, which keeps the pattern cleaner.
For safety and trust, add basic warnings in your pattern. The U.S. Consumer Product Safety Commission has guidance around small parts and children's products. If you sell finished toys, you should read it carefully: U.S. Consumer Product Safety Commission.
Testing, Editing, and Making a Pattern People Can Actually Follow
Pattern testing is where good designers become reliable designers. A tester will find the confusing sentence you can't see anymore. They'll also show you how your pattern behaves with different tension, yarn, and skill levels.

Run a structured test. Don't just send a PDF and ask, "Thoughts?" Ask for specific feedback so you can fix the parts that cause returns and bad reviews.
- Did any round counts feel wrong or unclear?
- Did shaping match the photo at each milestone?
- Were the pieces easy to sew in the right spot?
- Did any steps require guessing?
- Did the toy look like the sample when finished?
After feedback, edit for readability. Keep sentences short. Use consistent abbreviations and define them once near the top. If you reference "invisible decrease," explain it in one line. Buyers love feeling supported.
Photos matter too. A 2025 survey from Craft Industry Alliance discussed steady growth in the creator economy and how clear visuals improve digital product sales. It's not just art, it's conversion. If you want industry context, browse updates and research here: Craft Industry Alliance.
For your layout, aim for scannable sections:
- Materials list with exact quantities
- Skill level and stitch glossary
- Step-by-step with rounds, stitch counts, and checkpoints
- Assembly with photos or diagrams
- Finishing tips (stuffing firmness, blush, trimming ends)
One more pro move, add "checkpoints." A checkpoint is a note like, "At the end of R12, your piece should be as wide as a golf ball." It calms beginners and reduces support messages.
Selling Detailed Stuffed Toy Patterns Without Underpricing Yourself
Selling patterns is a different skill than crocheting. Your job is to help buyers imagine their finished toy, and make the purchase feel safe. Clear listing photos, strong descriptions, and fair pricing do most of the work.
Start with the product promise. Your title and first listing lines should name the toy, the size, and what makes it special. Detailed stuffed toys sell well because they feel like gifts, collectibles, or decor.
Pricing is tricky, so I use a simple comparison framework. Basic patterns often sit at a lower price because they're quick to make. Detailed patterns earn more because they take longer to design, test, and assemble.
- Beginner simple plush: fewer pieces, minimal face detail, faster make
- Intermediate detailed plush: more shaping, better photos, clearer assembly
- Advanced collector plush: sculpting, outfit layers, specialty stitches
To decide your price, consider the hours you spent designing, testing, and photographing. Digital patterns can scale, but buyers still expect quality. Many makers also bundle variations, like "bunny with 3 ear styles," which supports a higher price without feeling random.
For selling platforms, read their rules. Etsy has clear guidance on digital items and what's allowed in listings: Etsy Seller Handbook. Even if you sell through Squarespace, those guidelines are useful for learning what buyers expect.
Marketing doesn't need to be loud. Show the details. Post close-ups of the face, toes, and seams. Record a 10-second clip squeezing the toy to show stitch density. That single clip answers the buyer's biggest question: "Will mine look like that?"
If you want to grow a pattern catalog fast without repeating yourself, offer "mix and match" sets. One base body can support many animals by swapping ears, tails, and snouts. You can also sell custom versions. For that angle, buy custom crochet patterns online can help you think about what buyers look for and how they choose.
Frequently Asked Questions
What's the Best Yarn for Detailed Stuffed Toys?
Smooth yarn shows stitches clearly, which helps small details look sharp. Cotton and cotton blends are great for definition and embroidery. Acrylic can also work, but fuzzy acrylic hides stitches and can blur tiny features. If you want a "collector" look, try mercerized cotton because it has a slight shine and crisp stitch edges.

How Do I Keep Stuffing From Showing Through the Stitches?
Use a smaller hook, keep tension even, and use invisible decreases instead of standard decreases. Stuff in small amounts and push stuffing into corners with a tool. If you still see gaps, your yarn may be too thin for your stitch size. Going up one yarn weight or down one hook size usually fixes it.
How Do I Write Clear Round Instructions for Buyers?
Write each round with a stitch count at the end. Use repeat brackets like "(sc, inc) x 6" and keep that format consistent. Add checkpoints, like a size comparison, so buyers can self-correct early. If a step needs a photo, include it, even if it feels obvious to you.
Can I Sell Finished Toys Made From My Own Pattern?
Yes, if it's your original pattern, you can sell the finished items and the pattern. Add safety notes if you use small parts like safety eyes, especially for kids under three. If you plan to sell finished toys widely, read small-part safety guidance from official sources like the U.S. Consumer Product Safety Commission.
How Long Does It Take to Design a Detailed Crochet Toy Pattern?
A simple plush might take a few hours to design and write, but a detailed pattern can take days. You'll spend time on prototypes, math, photos, tester feedback, and edits. If you want the pattern to sell well, plan for at least one full test round with multiple testers so instructions are solid.
Final Notes and Your Next Move
Detailed toys sell because they feel personal. A tiny eyelid, a sculpted snout, or a clean seam can turn "cute" into "I need that." If your goal is to master How to Crochet Detailed Patterns, focus on three habits: count carefully, design in layers (shape first, details second), and test like a buyer will.
If you want a shortcut, build one "signature" base body, then create a series from it. That's how you stay creative without restarting every time.
If you'd like, I can also turn your next toy idea into a clean, buyer-friendly pattern layout for your Squarespace shop, including photo checklists and tester notes.